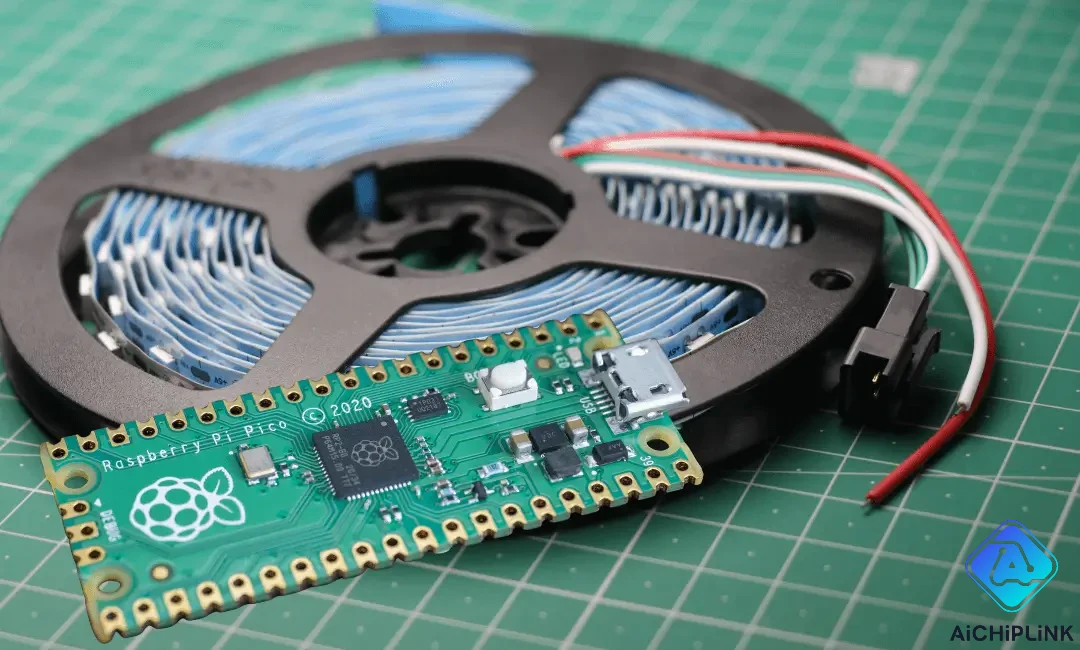
You can connect and control ws2812 rgb led strips via raspberry pi 02w. The ws2812 rgb led strip uses a single data line, so you need to use gpio 18 on your raspberry pi 02w. This pin gives you hardware PWM, which prevents flickering and helps you control the led strips smoothly. Always check the power for your ws2812 led strips. The led strips can draw a lot of current, so use a safe power supply. This guide will help you with the setup and show you how to control each ws2812 led with your raspberry pi ws2812 rgb led strip.
Key Takeaways
-
Always use GPIO 18 (Pin 12) on your Raspberry Pi 02W. This helps you control WS2812B LED strips well. Your lights will look smooth and not flicker.
-
Use a good 5V power supply for your LED strip. Make sure it gives enough current. Do not power long strips from the Raspberry Pi.
-
Connect all grounds together. This means the Raspberry Pi, LED strip, and power supply. This helps the data signals work right. It also stops flickering or random colors.
-
Install the rpi_ws281x Python library to control your LEDs. Use simple example scripts to test your setup first. Do this before making more complex effects.
-
Start with a short LED strip to test your wiring and code. Then you can make your project bigger. Always check your connections and power. This helps stop damage.
Parts & Power
Required Components
Before you start your setup, you need to gather the right parts. Using the correct hardware will help you avoid problems with your ws2812 led strip. Here is a list of what you need:
-
Raspberry Pi 02W
-
WS2812B led strip (choose a trusted brand for best results)
-
Reliable 5V power supply (at least 2A for short strips, more for longer ones)
-
Jumper wires for connections
-
1000µF capacitor (place this across the power rails to keep voltage steady)
-
Optional: Logic level shifter (helps if your led strip needs a stronger signal)
-
Breadboard or connectors for easy wiring
You should always use GPIO 18 (Pin 12) on your raspberry pi for the ws2812 data signal. This pin supports hardware PWM, which keeps your led colors smooth and prevents flickering. If you use the audio output on your pi, you may need to disable it to avoid conflicts with the ws2812 signal.
Tip: Start with a short ws2812 led strip. This makes it easier to test your setup and spot any wiring or power issues before you add more leds.
Power Supply for WS2812
The ws2812 led strip needs a steady 5V power supply. Each led can use up to 60mA when showing full white. For example, a 30-led strip at full brightness can draw about 1.8A. If you use a longer strip, the current goes up quickly. A 5-meter strip with 300 leds can use up to 18A. You should always use a power supply that gives more current than your leds need. This keeps your setup safe and your leds bright.
| Number of LEDs | Current Needed (Full Brightness) | Recommended Power Supply |
|---|---|---|
| 10 | 0.6A | 5V 2A |
| 30 | 1.8A | 5V 3A |
| 150 | 9A | 5V 10A |
| 300 | 18A | 5V 20A+ |
If you try to power too many leds from your raspberry pi, you may see flickering or random colors. The pi’s onboard power is not enough for long strips. Always use an external power supply for strips longer than 10 leds. Adding a large capacitor, like 1000µF, across the power rails helps prevent voltage drops and keeps your ws2812 leds running smoothly. You can also lower the brightness in your setup to reduce power use.
WS2812 Basics
What is WS2812
The ws2812 is a special type of addressable rgb led. Each ws2812 led has a tiny chip inside that lets you control its color and brightness. You only need one data wire to send commands to the whole strip. This makes wiring simple and neat.
Inside each ws2812 led, you will find:
-
An rgb led chip for bright colors
-
A built-in constant-current driver to keep the brightness steady
-
An internal oscillator and circuits for reshaping and amplifying the signal
-
A data latch that stores the color information
-
Three main pins: power (VDD), ground (VSS), and data in (DIN). Some strips also have a data out (DO) pin for chaining more leds.
The ws2812 uses a one-wire protocol. You send data to the first led, and it passes the rest of the data down the line. The ws2812b version adds a reverse polarity protection circuit, so you do not damage your leds if you connect the power the wrong way. The control and lighting circuits are separate inside the ws2812, which helps with heat and makes the leds last longer.
Note: The ws2812 works with many popular libraries, such as Adafruit and FastSPI, so you can find lots of code examples online.
WS2812 vs Other LEDs
You may wonder how the ws2812 compares to other addressable leds. Here are some key differences:
-
The ws2812 uses a single data line with strict timing. You only need one pin on your Raspberry Pi.
-
Other leds, like the APA102C, use two wires (data and clock). This allows faster updates but needs more wiring.
-
The ws2812 has a PWM frequency around 400 Hz. This can cause flickering in some cases. The APA102C uses a much higher frequency, so it does not flicker as much.
-
The ws2812 led strip is easy to use and affordable. It is great for most diy projects.
Here is a quick comparison:
| Feature | WS2812B LED Strip | APA102 LED Strip | SK6812 LED Strip |
|---|---|---|---|
| Control Lines | 1 (data) | 2 (data + clock) | 1 (data) |
| Refresh Rate | Moderate | High | Moderate |
| Voltage | 5V | 5V | 5V |
| Color Channels | RGB | RGB | RGBW |
| Wiring Complexity | Simple | More complex | Simple |
| Price | Affordable | Higher | Slightly higher |
| Advantages | Easy, popular, cheap | Fast, less flicker | Better white color |
| Disadvantages | Flicker, voltage drop | Expensive, complex | Slightly more expensive |
The ws2812 gives you individual control of each led, low power use, and bright colors. You can chain many leds together, but you may see voltage drop if you use a long strip. The ws2812 is a favorite for beginners and makers because it is simple and cost-effective.
Raspberry Pi WS2812 RGB LED Strip Wiring
Pinout Overview
You need to know the pinout of your raspberry pi 02w before you start wiring your ws2812 rgb led strip. The raspberry pi has a set of GPIO pins along one edge. Each pin has a number and a function. For the ws2812, you must use GPIO 18 (Pin 12). This pin supports hardware PWM, which is important for sending the right signals to your ws2812 leds.
Here is a simple table to help you find the key pins:
| Pin Name | Pin Number | Function |
|---|---|---|
| 5V Power | 2 or 4 | Power for led strips |
| Ground | 6, 9, 14 | Common ground |
| GPIO 18 | 12 | Data for ws2812 |
Tip: Always double-check the pin numbers on your raspberry pi before connecting anything. Mistakes can damage your board or your ws2812 rgb led strip.
Connect WS2812 to Raspberry Pi 02W
You can connect your ws2812 rgb led strip to the raspberry pi 02w by following these steps. This setup gives you stable and flicker-free control of your leds.
-
Connect the Power Lines
-
Attach the 5V pin from your external power supply to the 5V input on the ws2812 strip.
-
Connect the ground from the power supply to the ground pin on the ws2812 strip.
-
Link the ground from the raspberry pi to the same ground as the ws2812 and the power supply. This shared ground is very important. Without it, the data signal will not work, and your leds may not light up or may show random colors.
-
-
Connect the Data Line
-
Use a jumper wire to connect GPIO 18 (Pin 12) on the raspberry pi to the data input on the ws2812 strip.
-
If your ws2812 strip is far from the pi or you see unstable colors, you can use a logic level shifter. This device boosts the data signal from 3.3V (pi) to 5V (ws2812), making sure the leds read the signal correctly.
-
-
Add a Capacitor
- Place a 1000µF capacitor across the 5V and ground lines at the start of the ws2812 strip. This helps keep the voltage steady and protects your leds from power spikes.
-
Check Your Connections
- Make sure all wires are secure. Loose connections can cause flickering or even damage your raspberry pi or ws2812 rgb led strip.
Note: Never connect the 5V from your ws2812 power supply directly to the 5V pin on your raspberry pi. This can bypass the pi’s safety features and may cause permanent damage.
Why Use GPIO 18?
You should always use GPIO 18 (Pin 12) for the data line when working with ws2812 on the raspberry pi 02w. Here is why:
-
GPIO 18 is the only pin on the raspberry pi 02w that supports hardware PWM.
-
The rpi_ws281x library uses this pin to send precise timing signals to your ws2812 leds.
-
Hardware PWM with DMA keeps your led colors smooth and prevents flickering.
-
Other gpio pins use software PWM, which can cause timing problems and unstable leds.
-
Using GPIO 18 also keeps the cpu usage low and gives you stable performance, even with long strips.
-
You may need to disable the audio output and lower the GPU memory in your pi’s settings. This avoids conflicts with GPIO 18 and keeps your ws2812 rgb led strip running smoothly.
Tip: Edit the
/boot/config.txtfile on your raspberry pi. Setdtparam=audio=offandgpu_mem=16. Then reboot your pi. This step frees up GPIO 18 for your ws2812 leds.
Safety Notes
You must follow some safety rules when wiring your raspberry pi ws2812 rgb led strip:
-
Always use a common ground between the raspberry pi, the ws2812 strip, and the power supply. This ensures the data signal works.
-
Never connect the 5V power from the ws2812 supply to the pi’s 5V pin. This can damage your raspberry pi.
-
Double-check all connections before you power up. Incorrect wiring can cause flickering, random colors, or even destroy your leds and your pi.
-
If you see any strange behavior, turn off the power and check your wiring again.
Warning: Some power supplies can override the pi’s built-in protection. Always connect the power lines carefully to avoid hardware damage.
By following these steps, you can safely wire your ws2812 rgb led strip to your raspberry pi 02w. You will get bright, stable colors and avoid common problems like flickering or random lights.
Raspberry Pi 02W Setup Guide
You need a solid setup guide to make your ws2812 led strip work with your raspberry pi 02w. This section gives you a step-by-step emulator setup for your system. You will update your raspberry, install the required packages, and configure your gpio pins for the ws2812. Follow each part of this guide to avoid common problems and get your leds running smoothly.
Update System
Start your setup by making sure your raspberry pi 02w has the latest software. This step-by-step emulator setup helps your system work with the ws2812 and the python code you will use later. Use these steps:
-
Open a terminal on your raspberry.
-
Update your package sources:
sudo apt-get update -
Install the required packages for building and running the ws2812 library:
sudo apt-get install gcc make build-essential python-dev git scons swig -
Disable the audio output to free up gpio 18 for the ws2812:
-
Edit the audio blacklist file:
sudo nano /etc/modprobe.d/snd-blacklist.conf -
Add this line at the end:
blacklist snd_bcm2835
-
-
Edit the boot configuration to turn off audio:
sudo nano /boot/config.txt-
Find the line:
dtparam=audio=on -
Add a
#at the start so it looks like:#dtparam=audio=on
-
-
Save your changes and reboot your raspberry:
sudo reboot
Tip: Always reboot after making changes to your system files. This makes sure your raspberry uses the new settings.
Install Python Library
You need a special python library to control your ws2812 led strip. The rpi_ws281x library works best for the raspberry pi 02w. This library uses hardware PWM on gpio 18 and keeps your leds stable. It also uses Direct Memory Access (DMA) to send data to your ws2812 without using too much CPU power.
Other python libraries, like CircuitPython NeoPixel, work on some raspberry boards. They do not work well on the raspberry pi 02w because of timing issues and limited hardware support. The rpi_ws281x library handles the quirks of the pi and gives you smooth, flicker-free control.
To install the rpi_ws281x library, follow these steps:
-
Open a terminal on your raspberry.
-
Clone the library from GitHub:
git clone https://github.com/jgarff/rpi_ws281x.git -
Go into the library folder:
cd rpi_ws281x -
Build and install the library:
sudo scons cd python sudo python setup.py install -
You can now use python code to control your ws2812 led strip.
Note: Always use the latest version of the rpi_ws281x library. This gives you the best support for your raspberry pi 02w and your ws2812 leds.
Configure GPIO 18 for WS2812
You must set up gpio 18 for your ws2812 led strip. This pin supports hardware PWM, which is key for sending the right signals to your leds. The rpi_ws281x library uses gpio 18 by default, but you should always check your python code to make sure.
When you write your python code, set the gpio pin to 18. You also need to set the number of leds in your strip. Here is a simple example:
import board
import neopixel

pixel_pin = board.D18  # GPIO 18
num_pixels = 30        # Change this to match your ws2812 strip

pixels = neopixel.NeoPixel(pixel_pin, num_pixels, auto_write=False)
If you use the rpi_ws281x library directly, your code might look like this:
import neopixel
import board

strip = neopixel.NeoPixel(board.D18, 30)
Tip: Always double-check the gpio pin in your code. If you use the wrong pin, your ws2812 leds will not light up.
You should also test your setup with a simple python script. This helps you see if your ws2812 leds work before you write more complex code. Run the example scripts that come with the rpi_ws281x library. These scripts show you how to set colors, change brightness, and make patterns.
If you see flickering or no light, check your gpio settings, your power supply, and your code. The setup guide helps you fix these problems before you move on to bigger projects.
Note: The rpi_ws281x library takes care of most hardware issues for you. You only need to set the right gpio pin and the number of leds in your python code.
This setup guide gives you all the steps you need to prepare your raspberry pi 02w for ws2812 led control. You update your system, install the right python library, and configure gpio 18. Now you are ready to write code and bring your ws2812 leds to life.
Control WS2812 RGB LED Strips
Test Script
You can use a simple python script to test your ws2812 rgb led strip. This test helps you check if your wiring and setup work before you try more advanced effects. Follow these steps to run a basic test:
-
Install the needed python packages. Open a terminal and type:
sudo pip3 install rpi_ws281x sudo pip3 install adafruit-circuitpython-neopixel sudo python3 -m pip install --force-reinstall adafruit-blinka -
Download or write a python script like
strandtest.pyorOneStripNeopixels.py. These scripts show how to control the ws2812 rgb led strip using GPIO18. You set the number of leds, brightness, and color patterns in the code. -
Open Thonny IDE on your Raspberry Pi. Start Thonny with sudo by typing
sudo thonnyin the terminal. This gives your script access to the hardware. -
Copy the example code into Thonny or open the script file. Save it in your home folder.
-
Press the Run button in Thonny. The ws2812 rgb led strip should light up with the test colors and patterns.
-
If the leds do not light up, check the led count in the script. Make sure it matches your strip.
-
Troubleshoot if needed. Check your wiring, confirm all grounds connect, and make sure you use the correct data input on the ws2812 strip.
Tip: Always power your led strips with a good 5V supply. The Raspberry Pi cannot power long strips directly.
Edit and Run Code
You can change the python code to create your own effects and patterns. The neopixel library lets you control each led on your ws2812 strip. Here are some ways to edit your code:
-
Set up the ws2812 strip in python using
neopixel.NeoPixel. Pick the GPIO pin, number of leds, and brightness. -
Change the whole strip color with
.fill((R, G, B)). For example, usepixels.fill((255, 0, 0))for red. -
Set one led to a color by using its index. For example,
pixels[5] = (0, 0, 255)makes led 5 blue. -
Adjust the brightness in the code by changing the brightness value when you set up the strip.
-
Use loops in python to make moving effects. For example, you can light up leds one by one or make a rainbow.
-
Try different rgb values to get new colors. Use online rgb color charts to find the exact color you want.
-
Always run your script with sudo to avoid errors with GPIO access.
Common mistakes include not connecting all grounds, using the wrong end of the ws2812 strip for data, or setting the wrong led count in your code. If you see random colors or all leds turn white, check your wiring and code settings.
Note: Batch your pixel updates in code and call
strip.show()once for smoother effects. Lower the brightness in code to save power and keep your leds cool.
With these steps, you can control your ws2812 rgb led strip, test your setup, and create your own colorful effects using python scripts.
Troubleshooting
No Light Output
If your ws2812 led strips do not light up, you can check a few common problems. First, make sure you connect the power and ground wires to both the led strips and your Raspberry Pi. You must use a shared ground for the data signal to work. If you skip this, the led strips will not respond.
Next, check the data line. You should connect GPIO 18 to the data input on the ws2812 led strips. If you use the wrong pin, the led strips will stay dark. Also, look at your code. Make sure you set the correct number of leds and use the right pin in your code example. If you use the wrong code, the led strips will not light up.
If you still see no light, try running a simple example code. This helps you find out if the problem is with your wiring or your code.
Flickering Issues
Flickering leds can make your project look broken. You can fix most flickering problems by checking these areas:
-
Power supply issues often cause flickering. If your led strips do not get enough current, you will see random colors or flashes. Use a 5V 2A power supply for short strips. For longer strips, use a bigger supply. Measure the voltage at the led strips. It should be at least 4.8V. Add a 1000µF capacitor across the power rails to keep the voltage steady.
-
Audio interference can happen if you do not disable the audio on your Raspberry Pi. The audio system uses the same PWM as the ws2812 control. Edit
/boot/config.txtand setdtparam=audio=offto stop this conflict. -
Timing conflicts in your code settings can cause flickering. Set
LED_DMA=10andLED_FREQ_HZ=800000in your code example. If you still see problems, tryLED_DMA=5. -
Fake or poor-quality led strips can cause unfixable flickering. Always use authentic ws2812 led strips for the best performance.
-
The Raspberry Pi 02W has limited memory. If you run too many leds or complex code, you may see stuttering or flickering.
Always test your setup with a small number of leds first. This helps you spot hardware or code problems before you add more leds.
Software Errors
Software errors can stop your ws2812 led strips from working. If your code does not run, check for typos or missing libraries. Make sure you install the rpi_ws281x library and use the correct code example for your setup. Run your code with sudo to allow hardware access.
If you see error messages, read them carefully. They often tell you if you use the wrong pin or set the wrong number of leds. Try running a basic example code to check if the problem is with your code or your hardware.
| Error Message | What It Means | How to Fix |
|---|---|---|
| "No module named..." | Missing library | Install the needed library |
| "Permission denied" | Not running as root | Use sudo before your command |
| "Index out of range" | Wrong led count in code | Set the correct number of leds |
If you get stuck, look at the example scripts in the rpi_ws281x library. These examples show you how to control your ws2812 led strips and help you test your performance.
More Resources
Project Ideas
You can use your WS2812B LED strip with Raspberry Pi 02W for lots of fun projects. Try making a music visualizer. The lights will flash to the beat of your favorite songs. This project shows you how to connect sound to your lights. You can also build a retro gaming sign. It glows in different colors when you play games on your retropie. Some people make a project that shows scores or game status with LEDs during n64 emulation.
If you want to try more, make a pixel art display. The White Rabbit project lets you control a Neopixel XY matrix with your Raspberry Pi. You can show simple pictures or moving images. Some students build a project that matches LED colors with things happening in their favorite retro games. You can even make a project that changes LED patterns when you start retropie or n64 emulation.
Advanced users like to use LED matrix simulators. These tools help you plan your project before you wire the LEDs. You can also use the raspi_ws2812 kernel module or the rpi_ws281x library for harder projects. Try making a project that lights up your desk or gaming area with cool patterns. Many people mix retropie, retro gaming, and LED effects for a special project.
Tip: Begin with a small project. You can add more LEDs or features as you learn.
Community Links
You can find help and ideas for your project in many online groups. Here are some helpful links:
-
Raspberry Pi Forums – Ask questions about your project or share your retropie builds.
-
Reddit r/raspberry_pi – See project ideas, retro gaming setups, and n64 emulation tips.
-
Adafruit NeoPixel Guide – Learn about advanced LED project techniques.
-
GitHub rpi_ws281x – Find code and project examples for your LED strip.
-
RetroPie Official Site – Get guides for retropie, retro gaming, and project integration.
-
[Retro Gaming Discords and Forums] – Join groups to talk about project ideas, retropie, and n64 emulation.
You can share your project, ask for help, or join contests. Many people post photos and code for their retropie and LED projects. You will see lots of project examples that use retro gaming, retropie, and LED effects. These groups help you fix problems and learn new skills.
You have learned how to hook up and use a ws2812 led strip with your raspberry. Always pick GPIO 18 for smooth and steady led lights. Make sure the raspberry, led strip, and power supply all share the same ground. Use a good 5V power supply if you want to use more leds. This stops the lights from getting dim or acting strange. Begin with just a few leds to test your setup. Add more leds when you feel ready. Try out new project ideas and check online groups for help and tips. Be careful and have fun making cool ws2812 led projects!
FAQ
Can I power the WS2812B strip directly from the Raspberry Pi?
You should not power the WS2812B strip directly from the Raspberry Pi. The Pi cannot provide enough current for more than a few LEDs. Use a separate 5V power supply for your LED strip.
Do I need a logic level shifter for the data line?
Most WS2812B strips work best with a 5V data signal. The Raspberry Pi uses 3.3V logic. A logic level shifter helps ensure reliable data transfer, especially with longer strips or cables.
What happens if I connect the data wire to the wrong GPIO pin?
If you connect the data wire to the wrong GPIO pin, your LEDs will not light up or may show random colors. Always use GPIO 18 (Pin 12) for stable operation.
How do I reduce power usage and heat from my LED strip?
You can lower the brightness in your code. For example:
pixels = neopixel.NeoPixel(pixel_pin, num_pixels, brightness=0.2)
Lower brightness reduces power draw and keeps your LEDs cool.
Why do my LEDs flicker or show the wrong colors?
Written by Jack Elliott from AIChipLink.
AIChipLink, one of the fastest-growing global independent electronic components distributors in the world, offers millions of products from thousands of manufacturers, and many of our in-stock parts is available to ship same day.
We mainly source and distribute integrated circuit (IC) products of brands such as Broadcom, Microchip, Texas Instruments, Infineon, NXP, Analog Devices, Qualcomm, Intel, etc., which are widely used in communication & network, telecom, industrial control, new energy and automotive electronics.
Empowered by AI, Linked to the Future. Get started on AIChipLink.com and submit your RFQ online today!


